


Forget about classic chatbots for a moment. Imagine an assistant that could do more than talk, an assistant that could conjure up a UI element most appropriate for the situation… Such chatbots with power-ups are no myths; they are called conversational applications.
And so, for a change, this article will show you how to build a conversational app focusing on adding the exciting UI and backend elements that turn chatbots into real business workflow tools!
A Bit of Context
In the past few years, chatbots went from hype to near-obscurity. However, little by little, as chatbot technology became more sophisticated and more accessible, it made its way back to the spotlight. In fact, in times of the greatest world crisis in decades — the COVID-19 pandemic — chatbot tech, especially the no-code chatbots kind, came out as the hero of the hour.
The reason for such success?
Besides advances in NLP and artificial intelligence, which are still foreign to most, chatbots evolved from purely text-based interfaces into conversational apps — apps that are not only user-friendly but also simple enough to create and maintain, over other options like voice assistants, for example.
Conversational App Definition
As explained in our ultimate guide to conversational apps, a conversational app combines text-based messaging with visual UI elements for a better user experience. Rather than a simple text exchange, conversational apps enable users to interact with buttons, carousels, calendars, maps, videos, mini forms, and so forth when the use case calls for it.
Being able to switch from casual conversation to structured flow, conversational apps debunk the argument that conversational interfaces are not the best choice for every scenario.
Top Conversational App Use Cases
When can conversational apps be of most use and advantage?
Conversational app use cases, like chatbots’, vary significantly, but there are few situations where these more structured conversational interfaces come in particularly handy.
Bookings and Reservations
Conversational assistants are able to offer reassurance and support users' needs when trying to book a trip or reserve an accommodation. However, when it comes to data collection, many consumers found submitting sensitive information one by one taciturn and uncomfortable. Conversational apps allow you to use rich interface elements such as calendars, clocks or mini forms with structured data fields so the transition from conversation to conversion is smooth and frictionless.
Transactions
Chatbots are great at getting people to convert. Conversational apps are able to increase the conversion rate by allowing for the transaction to happen without forcing the user to leave the conversation. All the while providing them with a familiar transactional interface.
Product Recommendations
When it comes to product presentation, a thousand words cannot do what a single image or a video can. A chatbot can talk all it wants about the benefits and great features of your products, but that won’t be as effective as offering your customers visual stimulation. Conversational apps allow you to introduce products in the form of images, GIFS, videos, and even engaging carousels.
FAQ/Customer Service
When it comes to FAQ and customer service, it’s good to leave customers space to ask their own questions. However, text isn’t always the best way to present an answer. For instance, once a conversational app identifies user intent, it can then present the user with buttons or an in-chat form to help narrow down the issue. Alternatively, the app can use GIFs, videos, or downloadable files to offer the user issue resolution in the most relevant format possible.
How to Build a Conversational App Without Writing a Single Line of Code
Given the variety of elements and integrations involved in conversational app development, many consider it a costly and time-consuming affair. However, as mentioned at the start of this post, low and no-code platforms have made huge strides in making this technology accessible and understandable.
In fact, today, it’s possible to build a conversational app in a matter of minutes or hours.
To prove the point, this article will present a simple-to-follow tutorial on how to make a conversational app with a variety of interactive UI elements without coding.
NOTE: If you wish to follow along with this tutorial, click here to create a free Landbot account!
1. Create your “Work Space”
On your Landbot dashboard, click “Build a Chatbot” button in the upper right corner:

Once you do, you will see a pop-up of channel selection. Choose the web option:

Next, you will be redirected to the Landbot Template Library, which is the fastest way to go and build a conversational app. However, selecting a template would beat the purpose of this tutorial, so go on and click “Start from Scratch” also in the upper right corner:

Tadaaa! You made it into a Landbot visual drag-and-drop builder. Have a good look around:

2. Customize Your Welcome Message
Before anything else, adjust your Welcome message. This message is the first thing a user will see when interacting with your conversational app. It’s usually a good place to set expectations as well as establish the bot’s personality.
Check the video for the basics on how to go about it:
I decided to go with this setup:
3. Outline The Conversation Flow and Assign Question Format
Before you throw yourself into the conversational app development, it’s good to outline the data you want to collect as well as the format in which you want them to appear.
For instance, for our conference registration, we decided to gather the following information:
Personal data:
- Name
- Last Name
- Preferred Name/Nickname to Appear on Badge
- Business Email
- Phone number
- GDPR compliance
Company Data:
- Company information
- Country
- Social Networks
Hospitality:
- Arrival
- Dietary Restriction (No Restrictions, Vegetarian, Vegan, Allergies)
Merchandisee:
- Shirt size
- Preferred Color
Transactional Data:
- Payment
Thanks to the outline, we have a better overview of what the conversational flow will look like and can decide on how these questions will be presented.
For instance:
- Personal and company data: Multi-question feature
- Hospitality: (Rich) Buttons
- Merchandise: Buttons/Carrousel
- Transactional Data: Stripe Integration
4. Personal Data Multi-Question Block
Throw in some casual banter, and then drag an arrow to select the “Multi-Question” option from the features menu:

A new block and an accompanying editor will appear in the builder:

The Multi-Question block enables you to ask users several questions at once using a small conversational mini-form. The feature is extremely flexible, which makes it easy to adjust to any possible use case:
First, adjust the multi-question message to fit the occasion:

Next, create the first field by defining:
- Question Type
- Variable to store the data under
- Field Label

For additional adjustments, click the “Extra options.”
Of the possibilities, we defined the “help text” and cut the column width in half (though you can always do more!):

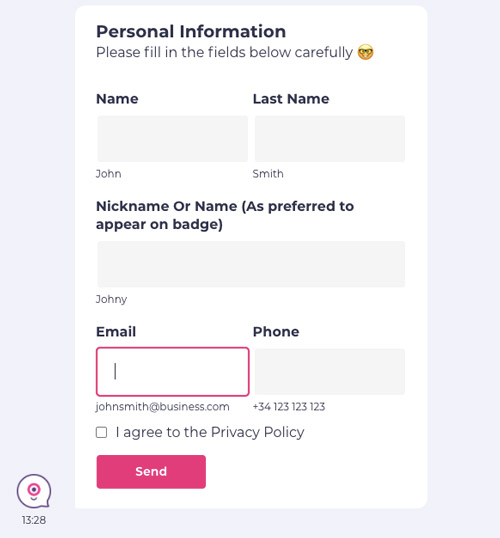
Next, repeat the process for the last name. To give you a better idea, on the front end, this simple setup will appear as follows:

But we are not done yet!
There are more personal information fields we need to add to the box!
For fields such as email, phone number and the privacy policy checkbox, make sure to choose the appropriate “Question Type”. That way, the bot will automatically check the information for an appropriate format:

Some of the question types can have additional fields such as the checkbox setup with “Add Options”:

The final Multi-question setup will look as follows:
5. Use Variables To Personalize The Process
Thanks to the variables, you can use the collected data in real-time to personalize the experience for every single user:

6. Continue Collecting Data with Formatted Questions
The next set of data to collect are company-related information:
- Company Name
- Country
- URL
- Social Networks
To help ensure you get the data in the right format, you can use any relevant question type blog from the features menu:

For instance, using the URL question block instead of the generic TEXT block will ensure the conversation doesn’t continue unless a valid form URL is submitted.

Now, to ask for social networks, we can once again use the multi-question block:

And the front end:

7. Use Buttons To Streamline Choices
If you need your users to make a quick succession of choices, the simple buttons are the best way to go.
In Landbot, when selecting the next block, choose the “Buttons” block option and simply edit the questions and options:

And the user will be able to select the relevant option quickly and without the hassle:

You can always take the buttons to the next level. Just click on the three little dots in the upper right corner of the block to open an advanced button editor:

Click on the settings icon to open an editing section for each of the buttons. There, you can change the button style to include:
- Icon
- Emoji
- Image

For example, select the emoji option and assign one for each button option:

In the front end, the emoji buttons will look as follows:

8. Set Up Multiple Choice
However, we have only scraped the surface of the button's advanced editor. If you scroll down to the bottom, you will see it offers you the possibility to:
- Redefine buttons alignment
- Display buttons as searchable options instead
- Allow for multiple-choice selection
- AND save the user response under a unique variable like with the rest of the blocks!

So far, we have exited each Buttons block through the purple DEFAULT option because there was no flow diversion based on user answers. However, now, we will need a bit more information from those who select “I’m Allergic.”
Therefore, this time, draw an arrow from the “I’m Allergic” button, create another Buttons block, and activate the multiple-choice option. After all, a person can be allergic to more than one thing:

When a user arrives at this point of the conversation, they will be presented with a very straightforward multiple-choice table:

This way, users who choose one of the first three options can continue straight on, and only those with an allergy complete this extra step.
9. Create a Carousel
Next, it’s time to move on to collecting merchandise data:

Besides classic, image, icon, or emoji buttons, you can switch things up by using a carousel feature (ideal for product display). In the Landbot builder, you can find the carousel under the name “Picture Choice.” The setup is very similar to working with buttons. You need to define the title, the image, and (if relevant) a URL:

Using this feature, the final user experience will look like this:
10. Insert the Transaction Element
Introducing a transactional element into the conversation has never been easier. All you need to do is select the chatbot Stripe integration from the features menu and set up the connection:

However, this layout only appears if you are setting up a new account. If you already have one, all you need to do is:
- Define the amount to be paid (it can be fixed or @variable based on user choices, e.g., based on what has been added to the cart)
- Select currency in which the amount will be charged
- Define the message to appear with the payment form

In the front end, the Stripe payment will appear as follows:

11. Integrate, Integrate, Integrate
So far, you have seen elements that improve the end-user experience. However, conversational apps can do for your internal workflows as much as they do for the UX.
Thanks to out-of-the-box integrations or a simplified webhook setup, you can connect your conversational app to your existing workflow without hassle.
For instance, one of the easiest ways to manage data export, import, and update with Landbot is using the Google Sheets integration:

In a similar way, you can easily connect to Mailchimp, Slack, Salesforce, etc.
However, many take advantage of the simplified API webhook setup to connect their conversational apps to tools such as Airtable:

If you don’t feel like setting up a webhook all by yourself, you can always check out Landbot Bricks Library. Bricks in Landbot work like plugins. They are reusable fractions of flow. You can either create your own or use the ones available in the public library:
For example, the email validation brick already comes with a pre-set webhook connecting to an email verification database. The notes inside the brick guide you to make minor adjustments to customize it to your needs.
You Made It!
Learning how to create conversational apps has never been simpler. You can easily bring them to life in a matter of hours or even minutes.
This tutorial shows how to build a conversational app for the web but you can easily adjust the setup to a messaging app such as Messenger or WhatsApp (respecting their UI limitations, of course). So, if you want to give it a try, just sign up for free and try all the advanced features as part of your free trial!


.jpg)


%2520(1).jpeg)

.jpeg)


.jpeg)


%20(1).png)


